
Tag: Lake Huron
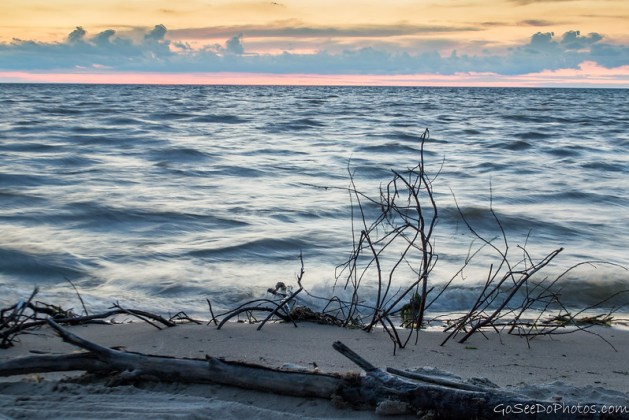
This past weekend we ventured to Port Crescent State Park, at the tip of the thumb. I had never been to that part of the state before and I was excited to check it out. Luckily, we were able to catch a stunning sunset the first night because it rained the rest of the weekend. I was really hoping to kayak to Turnip Rock, but I wasn’t about to do that in a thunderstorm.
We decided to not let the rain get us down and we drove around and explored the area. The lake was gorgeous like all of the Great Lakes, but honestly, there wasn’t much else to see. It’s a very flat part of the state and is mostly filled with farms and windmills. Maybe it was the weather, but The Thumb didn’t win my heart like the Ludington area did. I’m sure we will be back because I still want to check out Turnip Rock, so maybe my second impression will change my mind.
To learn more about the Thumb Region, visit ThumbTourism.org. Thanks for stopping by! If you like my photos be sure to “like” my Facebook Page, follow me on Instagram, and Flickr! To see inside my camera bag, check out my Gear Page.
Pin This!


In Sault Ste. Marie I picked up a Michigan Lighthouse Map which shows every lighthouse in Michigan and whether or not its open to the public. So, when we were making the drive down the Lake Huron coast, we made a point to stop at all the lighthouses we could. We managed to stop at 7 lighthouses on our way down south including three in Presque Isle, two of which we climbed. The above photo is of the Tawas Point Lighthouse.
For our night on Lake Huron we stayed at Hoeft State Park in Rogers City (south of Cheboygan). This park surprised me. We were there the Friday before the Fourth of July and I was expecting it to be kind of rowdy but it wasn’t at all. It seemed to be mostly families, a lot of which had bikes and were making use of Huron Sunrise Trail. The sites were big and wooded, but the bathrooms didn’t live up to Hartwick Pines (this was the theme of the trip). If I was looking to stay near Lake Huron, I come back here in a heartbeat!
About the Photo:
I got incredibly lucky with this picture! There were no Photoshop tricks or external flash used here. We happened to get to the lighthouse when it was sprinkling a little, but a bigger rain was definitely on its way. To the west, the sun was not covered by clouds with made for this awesome cloudy background with evening light on the lighthouse. This was a single RAW exposure with basic edits done in Lightroom.
Camera Gear:
Nikon D3100 with 18-55 kit lens and polarizer, handheld
Date Taken:
July 2, 2016
Thanks for stopping by! If you like my photos be sure to “like” my Facebook Page, follow me on Instagram, and Flickr! To see inside my camera bag, check out my Gear Page. To plan your Lighthouse Exploration Trip, visit MichiganLighthouseGuide.com. To book your stay at Hoeft State Park visit the Michigan DNR.
Pin This!


Visiting Mackinac Island is like taking a step back in time. No cars are allowed on the island, so everyone either walks, rides a bike, or gets around by horse drawn carriage. One of the most popular things to do is to rent bikes and ride the 8.2 mile trail around the island. We rented a tandem bike from Ryba’s bike rentals. I had never ridden a tandem before but once I got used to it, it was a lot of fun, and now I want one! It was nice to not have to do all the work myself!
There are three ferry companies that transport guests to the island. We chose Arnold Line, which has the slowest boats but the cheapest fares (Update: at the end of 2016, Star Line bought all of Arnold’s assets and now operate the slow boats) . We were able to get a 2-day pass for the price of one round trip on the other lines. We weren’t in a hurry, so the extra 15 minutes weren’t that big of a deal to us. The first day, we went to the island from Mackinaw City and the second day from St. Igance. Arnold had more and later departures to and from Mackinaw City, but the ride from St. Ignace was a lot more scenic since you actually drive around the island.
About the Photo:
This shot was taken from the ferry on the way to the island from St. Ignace on a foggy morning. This was a single RAW exposure edited with an Improve Photography Black & White preset in Lightroom.
Camera Gear:
Nikon D3100 with the 55-200 kit lens, handheld
Date Taken:
June 26, 2016
Thanks for stopping by! If you like my photos be sure to “like” my Facebook Page, follow me on Instagram, and Flickr! To see inside my camera bag, check out my Gear Page. To plan your visit to Mackinac Island visit, MackinacIsland.org.
Pin This!


From the moment I knew we were going to stay at Straits State Park in St. Ignace, and that we would have a campsite right on the water, I knew that I wanted to take a photo of my illuminated tent with the Mackinac Bridge in the background. This post will walk through the process I took to come out with this image.
Planning:
I took the photo during late blue hour because I wanted a relatively even exposure between the lights on the bridge and the illuminated tent. I considered using my speedlight in the tent, and that may have yielded a better illumination, but in the end I decided to use a few LED flashlights, as I didn’t want to be obnoxious in the campsite with a flashing tent. I walked around the site to get the best composition, and then set up my tripod.
Shooting:
It would be very easy to get all of this (and more) in frame with a lens on the wider end of the spectrum. This was my first instinct; however, my first peek in the viewfinder reminded me of a very real issue: when shooting below approximately 50 mm, background objects appear increasingly smaller as compared to how they are viewed by the human eye. In other words, at 18mm, everything is in frame, but there is a huge tent and a tiny bridge. This is no good.
The solution to this problem is to go telephoto. Above 50mm or so, objects in the background appear larger than they do to the human eye, and the greater the focal length, the closer one will get to a point where background and foreground are nearly identical in perceived size.
The telephoto presents a second issue though, and that is that I could not back up far enough to get everything in frame. We have a technological solution to this though, and a relatively easy one to execute since I was on a tripod. I started on the left and took an exposure, then I panned until I had about 2/3 of the frame as new stuff and I took another exposure. I repeated this process until I had everything covered, with a decent amount on either side in case I had to crop due to my technique not being perfect.
My exposures were at f/11, ISO 400, for 30 seconds.
The Lightroom Editing:
The first step was to stitch everything together, which is easily accomplished in Lightroom. Then I cropped, and made simple exposure and contrast adjustments, as well as some color corrections.
The Photoshop Edit:
This was the time consuming bit of the edit. I’m just going to list everything that I did.
- Using content aware fill, I removed the branding from the tent
- Using luminosity masks, I did the following
- Corrected some exposure issues in the bridge and water
- Brushed noise reduction into the shadows
- Using a high pass filter, cloned and emphasized texture in the tent
- Using the camera raw filter, I added vignette and other minor finishing touches
So that’s how I got the shot. It’s not perfect, but I think it tells a great story and I learned a lot. I am confident that the next time I am in this kind of situation I can come out with something even better.
Date Taken:
June 26, 2016
Thank you for reading. You can see my best work on 500px and can also find pictures of the “trying my hardest to be good at this” type on Flickr or Pixoto.
Also, be sure to like the Go See Do Facebook Page, and follow Ashleigh on Instagram and Flickr! Check out our Gear page to see inside our camera bag!
