Travel by Any Means Necessary

Tag: hike Page 1 of 2

Returning to El Yunque

Angelito Trail

After our night kayaking adventure, we got up the next morning to hike El Yunque National Forest. Since we were traveling with my mother-in-law, we tried to convince her to do the Mt. Briton trail with us, but she was looking for something a little easier. So, we ended up hiking Juan Diego Falls. The Juan Diego Falls Trail is a short, easy trail in El Yunque that leads to a waterfall with a natural pool. The forest service map says the trail is a five-minute walk and it is absolutely worth it. Since we were there early we had the trail and the waterfall to ourselves, but I imagine it fills up with swimmers later in the day.

Currently, to access La Mina Recreation Area at El Yunque National Forest you need a timed reservation that you can get in advance for $2 at Recreation.gov. Reservations are available 30 days in advance and can book up the day they open. More open up 24 hours in advance if you are unable to get them 30 days out.

After the hike, we headed to the El Portal Visitor Center. The visitor center has been beautifully remodeled since Hurricane Maria and now has a unique, open-air design that fits in with the forest surrounding it. I enjoyed seeing the exhibits and watching the film (narrated by Benicio del Toro) and would recommend a stop here for all first-time visitors to El Yunque and Puerto Rico. A downside is that there is only one trail at the Visitor Center, the Interpretive Trail, and it doesn’t connect to other parts of the National Forest. There is an entrance fee of $8 per person, but there is a discount for America the Beautiful pass holders.

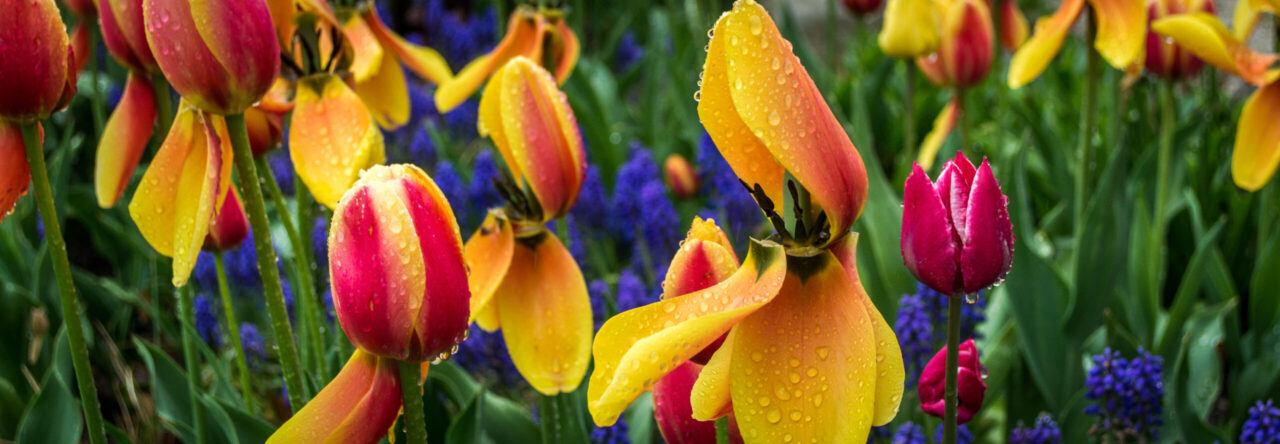
After stopping at the Visitor Center, we headed to the Angelito Trail, which is outside of the La Mina Recreation Area and leads to a popular swimming hole. Since it is outside of La Mina, you do not need a reservation to hike the Angelito Trail. Because of this, it was very busy and roadside parking was hard to find. The Angelito trail is an easy hike (.2 miles each way) through Tabonuco trees (top). We saw families of all ages on the trail and enjoying the river at the end. If you are unable to get reservations for La Mina, this is a good place to check out to get a feel for El Yunque.

Thanks for stopping by! To read more about this trip, check out the Returning to Puerto Rico Trip Report. To read about some of our previous trips, visit my Trips Page. If you like my photos be sure to “like” my Facebook Page and follow me on Instagram! For my list of gadgets to make your travels easier, click here. To see inside my camera bag, check out my updated Gear Page.

Wordless Wednesday: Hurricane Hill

Hurricane Hill Panorama

Wordless Wednesday: Driftwood

Log Across Ellen Creek

Hiking Olympic National Park: Rialto Beach

Rialto Beach at Low Tide

After leaving the Lake Crescent Area, we headed to the coast, specifically Rialto Beach. There are many beaches in Olympic National Park so it was hard to choose one to visit. Ruby Beach, one of the most popular beaches on the Olympic Peninsula was closed when we visited due to road construction, so we chose to visit Rialto Beach and do the Hole-in-the-Wall Hike.

When deciding what days to do what in Olympic National Park, we looked at the tide chart. The hike to Hole-in-the-Wall can only be accessed during low tide so we had to plan our visit accordingly. There is a forest service trail that would allow you to see the Hole-in-the-Wall formation during high tide, but you wouldn’t be able to get as close or see the life in the tide pools.

When we got to the beach, it was drizzling a little and it was overcast with a little fog. There were strange rock formations jutting out from the water. It was unlike anything I had ever seen anywhere else. We drove through the town of Forks, Washington to get to the beach and I totally understood why Stephanie Meyer set the Twilight books in this area. It looks like a place where strange sparkly vampires would live!

Tides at Rialto Beach

The trail is a 3.3-mile long out-and-back trail and most of the hike is just an easy walk on the beach, but there are some tricky sections.  The scariest part for me (and most of the other women hikers we saw) was the part where you had to cross Ellen’s Creek small stream that dumps into the ocean. The only way to cross it was by walking over a log. One woman told me, I’m sure as an attempt to reassure me, “I’ve been standing here over an hour and I haven’t seen anyone fall in yet.” Luckily, I didn’t ruin her streak, but I did take the chicken’s way out on the way back and scoot across on my butt. Apparently, when the creek is less full, people wade through it instead of the scrambling we had to do.

Starfish at Hole in the WallFrom there it wasn’t much further to the rock and the feature known as Hole-in-the-Wall. It is known as Hole-in-the-Wall because over time, the tide eroded the center of the rock and created a hole big enough to walk through. The walk on the rocks was slippery and I was very worried I was going to fall, but seeing all the life in the tide pools was absolutely worth it! We had never explored tide pools before so it was really cool to see!  I had no idea starfish came in so many colors! It was crazy because you could be looking at a part of the rock for a while and just keep seeing more.

If you are looking for a beach to visit in Olympic National Park, I highly recommend Rialto Beach and the hike to Hole-in-the-Wall. If you are planning to do this hike, waterproof hiking boots with good traction are a must. Walking on the beach, our feet got a little wet, but scrambling over wet rocks would’ve been near impossible without our hiking boots.

Thanks for stopping by! Be sure to check back next week when I share about our time exploring Hurricane Ridge! To read more about this trip check out my Planes, Buses, and Boats Trip Report. To read about some of our previous trips, visit my Trips Page. If you like my photos be sure to “like” my Facebook Page and follow me on Instagram! You can purchase prints on Fine Art America. To see inside my camera bag, check out my updated Gear Page.

Pin This:

Rialto Beach Pinterest Graphic

Wordless Wednesday: El Yunque

El Yunque Mountains

East Side of Glacier National Park

Wild Goose Island

After leaving Yellowstone in the morning, we arrived at the East Side of Glacier National Park after about seven hours on the road. The famous Going to the Sun Road hadn’t opened for the season yet, so the east side of the park was pretty quiet.

Baring FallsEven though we knew we couldn’t cross Logan Pass, we turned on our GyPSy guide and drove the part of the road that was open. One of the hikes the guide recommended as an easy hike on the east side of the park was the hike to Baring Falls (left). The hike is less than a mile round trip and was a good way to ease into hiking in Glacier with only 400 feet of change in elevation. At a 25 foot drop, Baring Falls is by no means the biggest waterfall in the area, but it is definitely one of the easiest hikes on the east side of the park. We saw a deer grazing near the water, which was a nice treat.

Room at Rising Sun Motor Inn

Our room at Rising Sun.

After our hike, we headed to our room for the first part of our time in Glacier at the Rising Sun Motor Inn. This location wasn’t my first choice, especially so early in the season with the Going to the Sun Road closed, but the room was available two months ahead, so we grabbed it. The motel-style hotel is not my favorite but I will take it if it allows me to sleep inside a National Park. The rooms were clean and the private bathroom was a big step up from our Old House Room at the Old Faithful Inn. We hardly saw anyone else around. The downside to staying at Rising Sun in 2021 was that the restaurant, Two Dog Flats, was closed for the season due to staffing shortages. I didn’t think anything of it when we got the email in advance. I figured we would be able to find some food outside the park in St. Mary. I did not realize how dismal the dining choices would be. If I had it to do over, I would’ve planned to cook on our camp stove in the Rising Sun Picnic area across the street.

Overall, I enjoyed our stay at Rising Sun, but if you’re booking early in the season, be aware that the Going to the Sun Road probably won’t open until the end of June or early July and that really limits what you can see. If Two Dog Flats is closed again, you may want to try to find lodging on the west side of the park where there are more services.

Thanks for stopping by! To read more about this trip, check out the Epic National Park Road Trip. To read about some of our previous trips, visit my Trips Page. If you like my photos be sure to “like” my Facebook Page and follow me on Instagram! You can purchase prints on Etsy and Fine Art America. To see inside my camera bag, check out my updated Gear Page.

Pin This:

Baring Falls Pin Glacier Pinterest Graphic

Yellowstone: Mammoth and Canyon in One Day

Mammoth Hot Springs

Steam coming off Mammoth Hot Springs

This post contains a lot of information about driving around Yellowstone. Here is a link to a map of the park, that will probably be a helpful reference while you read about our first day in Yellowstone.

Our first day in Yellowstone, we came into the park from Cody. I really believe this played a hand in our ability to see so much of the park in just one day. Unlike the west entrance, there was no line coming in from the east side of the park. The first point of interest coming in this way is Yellowstone Lake and the Fishing Bridge area. This is one of the lesser-visited parts of the park and it felt like we were the only people around for miles.

Clouds over Yellowstone Lake

Yellowstone Lake (above) is a sight to behold. Situated at 7700 feet above sea level and taking up 132 square miles, Yellowstone Lake is the largest high elevation lake in North America. Because of the large surface area, sudden gusts of wind can create large waves making open water crossings of the lake very challenging. Because of that and the cold water temperatures, boating on Yellowstone Lake is not incredibly common.

Grand Canyon of the Yellowstone
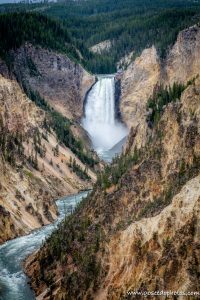
From Fishing Bridge, we headed north to Canyon Village and one of my must-sees, Grand Canyon of the Yellowstone. There is a very large parking area in the canyon area and we had no trouble finding a spot to park.  One of the best views of the falls can be found at the Artist Point trailhead (left). I love how even unedited photos of the waterfall look like a watercolor painting. This is one of the most popular areas to hike in the park with plenty of hiking trails for all abilities. For more information about hiking in Yellowstone, visit NPS.gov.

The color of the rock makes The Grand Canyon of the Yellowstone one of the most unique waterfalls I have ever seen. At one time a geyser basin was located at what is now the base of the waterfall. The heat and chemical activity of those geysers created rhyolite, a soft and brittle rock. The rhyolite reacts to oxygen in the air and in effect, the canyon walls are rusting, which gives it that unique yellow color.

From Canyon, we headed toward Mammoth. The drive through that part of the park felt longer than going from Lake to Canyon, but maybe it was just that there isn’t anything to stop and see from Norris to Mammoth. I’m not sure if this is normally the route you would take to get from one area to another, but the road from Tower/Roosevelt to Canyon was closed for construction in 2021.

Mammoth Hot Springs

Mammoth Hot Springs (top and right) was another feature on my Yellowstone Must-See list. I had seen photos of the unique, stair-like geothermal feature and wanted to see it for myself. The water in the springs container calcium carbonate that over time cools and creates these unique rock formations. It was interesting walking around and seeing how the pools have shifted over time, as evidenced by forests of dead trees with white, calcified bases.

Bear and Two Cubs

From Mammoth, we headed to Tower/Roosevelt and this is where we encountered our biggest “jam” of our time in the park. This time, instead of elk, it was a mother bear with two cubs (viewed from a safe distance, of course, and with a ranger standing by with bear spray). It was super cool to see these wild animals through a zoom lens. It was definitely better than seeing them at the zoo!

After our bear encounter, we headed out the Northwest Entrance of the park to Gardiner for dinner. Be sure to stop back next week as I share about our day of exploring geysers and hot springs!

Thanks for stopping by! To read more about this trip, check out the Epic National Park Road Trip. To read about some of our previous trips, visit my Trips Page. If you like my photos be sure to “like” my Facebook Page and follow me on Instagram! You can purchase prints on Etsy and Fine Art America. To see inside my camera bag, check out my updated Gear Page.

Pin This:

Mammoth Hot SpringsPinterest Graphic Grand Canyon of the Yellowstone Pinterest Graphic

Wordless Wednesday: Empire Bluff View

Empire Bluff Trail in the Shade

Wordless Wednesday: Eagle Falls

Hiking Eagle Falls

Hiking Pictured Rocks: Chapel Rock

Chapel Rock

While camping at Tahquamenon Falls, we decided to take a day trip to Pictured Rocks National Lakeshore. The lakeshore has blown up in popularity the last few years after being featured on Good Morning America. We used to refer to Munising as a food desert because if you didn’t bring it with you, you weren’t eating it there. With increased visitation, new restaurants and shops have popped up outside of the park. This was the first time we had been back to this area since our UP Road trip in 2015 and it was really good to see some life in this area!

Chapel FallsThe downside of the increased visitation is that the trails and parking lots were jam-packed with people. We decided to hike to Chapel Falls and there were so many cars on the side of the road to the Chapel Falls parking lot, it took us an hour to drive 3 1/2 miles to the lot. Being a holiday weekend, we were expecting crowds, but we weren’t expecting this level of crowds.

The hike to Chapel Falls (left) is about three miles round trip. The trail is on an old rail bed so it is relatively flat and a pretty easy hike. Somehow, when we got to the falls, Chris convinced me to double the length of our hike and continue on to Chapel Rock and Lake Superior (top). The rest of the trail was just as easy as before and the added mileage meant the crowds dropped off significantly. Overall, I’m glad we did the whole hike, but my legs were jelly by the time we got back to the car.


View this post on Instagram


A post shared by Ashleigh Mowers (@goseedophotography)

If you plan to visit Pictured Rocks, definitely take some time to check out the revitalized downtown Munising. There are now many highly rated places to eat on TripAdvisor. If you plan to do this hike, arrive early, or pack your patience. We arrived after lunch and were able to get a spot in the lot, but as I mentioned above, it took a long time to get all the way there.

Thanks for stopping by! To read about some of our previous trips, click here. If you like my photos be sure to “like” my Facebook Page, follow me on Instagram! You can purchase prints on Etsy and Fine Art America. To see inside my camera bag, check out my Gear Page. For information about our new Guided Photography Tours, visit GuidedPhoto.com.

Pin This:

Chapel Rock Pinterest Graphic


Page 1 of 2

Powered by WordPress & Theme by Anders Norén